Showing posts with label migration. Show all posts

5.13.2020

Migration methods to Autonomous Database (ADB) - Part III (SQL Developer)

In part III article series of Migration methods to Autonomous Database we will see how to migrate or load data into ADB using SQL Developer.

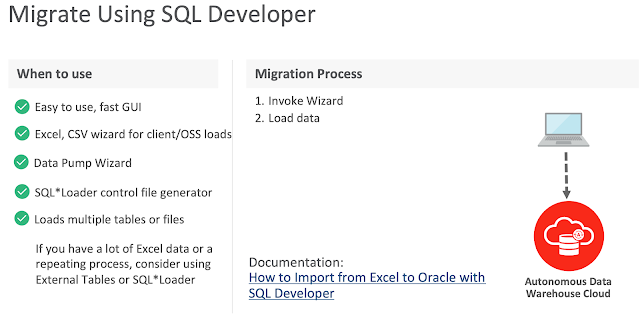
Below slide from Oracle presentation depicts SQL Developer different use cases to migrate or load data into ADB:


Following screenshots walk through data loading scenario from an excel sheet into an existing table using SQL Developer. To walk though this demonstration, ensure the following is in-place:

  • an ADB is created and running
  • You have downloaded the database connection credentials (as shown in the below screenshots)
  • You have an excel sheet to load the data


Downloading connection credentials

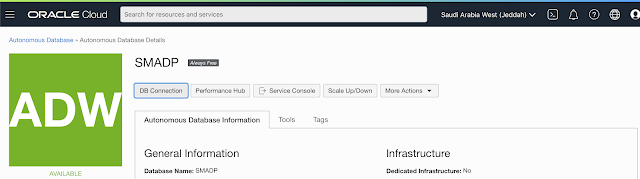
Presuming an ADB is created and it's up & running. From the OCI console, select the ADB, click the DB Connection tab to download the credentails.


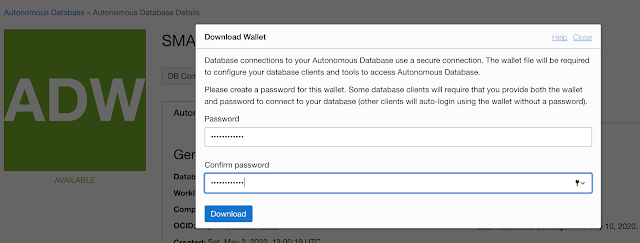
You have to input a password before you download the connection credentials.


Start the SQL Developer tool and connect to the ADB using the credentials downloaded previously.

Specify the location of the .zip files (connection credentials) and choose the suitable TNS service, high, medium or low.


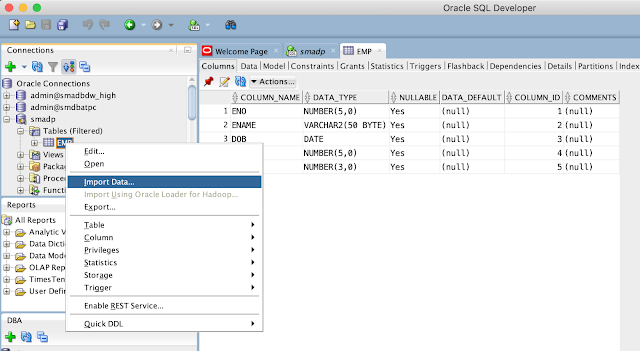
Once you connected to the database, select table and choose import data option by clicking the right mouse button on the table, as shown below:


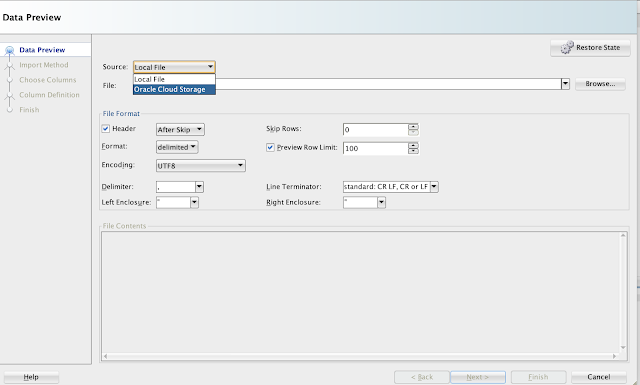
In this scenario, there is a table 'EMP, and we will load the data from an excel sheet. So, choose the file. Ensure you select Local File option from the Source.


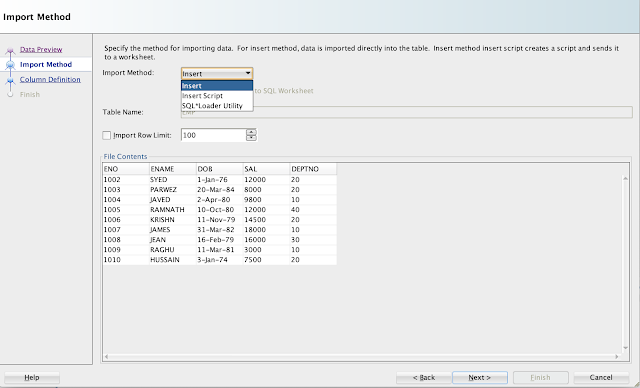
Choose Insert option from Import Method:


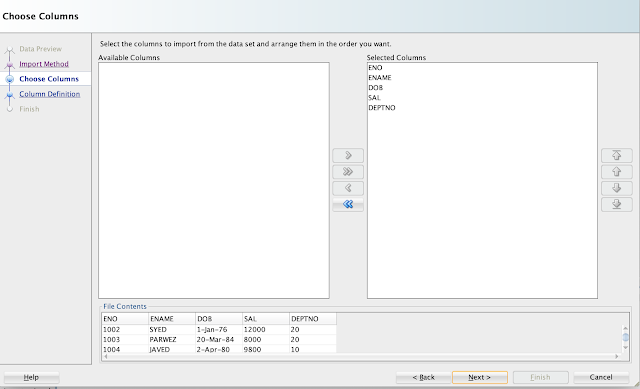
Map the columns, if not already selected.


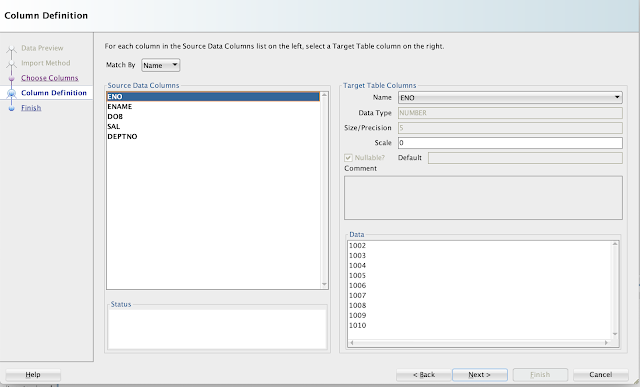
Choose the Match by option drop down list:


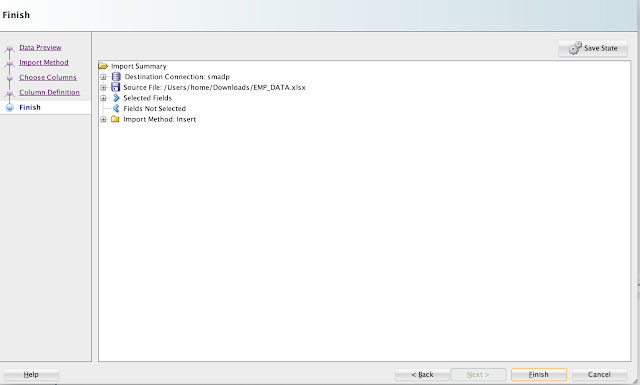
Finish gives the import details.


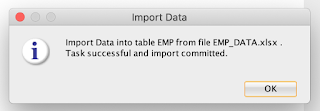
Once you click the Finish button, data will be loaded successfully and below message will appear:


And you can see the data is successfully loaded and can be viewed.


So using SQL Developer, you can easily load the data from files CSV, XLS, XLSX, TSV and TXT.
Hope you got the basic understanding of data loading using SQL Developer.

5.12.2020

Migration methods to Autonomous Database (ADB) - Part II (MV2ADB)

In part II of migration methods to ADB blog series, we will look into MV2ADB tool details and usage. If you haven't read the Part I, I would encourage you to read it to get basic knowledge on various solutions offered by Oracle and some of the prerequisites for on-premise database migration to ADB.

Move to Autonomous Database (aka MV2ADB) tool new tool introduced by Oracle to easily migrate on-premise Oracle database over Autonomous Database levering Oracle data pump capabilities. The tool automates data loading into Oracle Object storage and migrating the data into ADB by one-click option.

The picture below depicts the flow of data migration process using the MV2ADB tool:


Ensure following conditions are met before you launch the migration operation:

  • HTTP connectivity between on-premise and Oracle object storage.  Required to move dump files
  • Download ADB credentials file
  • Download and install latest Oracle client to have new version of expdp/impdp and other essential tools
  • Perl >=5.10
  • Perl-data-dumper
  • Set java in execution path
  • Also download and configure OCI CLI from the below link:

https://github.com/oracle/oci-cli


The MV2ADB tool can be installed on-premise using the RPM shown below:

# rpm -i mv2adb-2.0.1-X.noarch.rpm

Following is the directory structure of the tool:

# tree /opt/mv2adb/
/opt/mv2adb/
├── conf
|   └── DBNAME.mv2atp.cfg
├── lib
|   ├── MV2ADB_LoggingAndTracing.pm
|   ├── MV2ADB_passwd.jar
|   ├── MV2ADB_PFile.pm
|   ├── MV2ADB_Queries.pm
|   └── MV2ADB_Utils.pm
└── mv2adb
└── utils
    ├── install_adb_advisor.sql
    └── premigration.jar


 You can also download the tool zip file mv2adb-2.0.1-X.tar.gz from the MOS specified here and using below tar command to untar the file into a specific directory on the server.

tar xvfz mv2adb-2.0.1.X.tar.gz -C <target directory>

Before you use the tool, ensue the path is set correct, as shown below:

$ export MV2ADB_HOME=/home/oracle/mv2adb/mv2adb-2.0.1.x


Using command below, you can de-install the tool:

# rpm -e mv2adb-2.0.1-X.noarch


You can refer the log files for diagnose issues related to the tool:

"/opt/mv2adb/out/log"


MV2ADB supports following operational modes:

  • Auto Operations
  • ExpDP Operations
  • ImpDP Operation
  • OCI Object Storage/Bucket Operations
  • Database Schema Operations
  • Encrypt Password Operations
The Auto operations (aka one command operation) automates the entire migration operation, performing the following individual operation:
  • Schema based expdp from source database
  • Upload the dump file over OCI object storage
  • Loading data with impdp to ADB
Refer the below sytanx for parameters and usage:


Courtesy MOS 2463574.1

Example with configuration file:
# ./mv2adb auto -conf conf/mv2atp.cfg

As mentioned the different operation modes, you can also use to export, copy, or import data using individual operation modes available with the tool. Refer the examples below:

# ./mv2adb expdp \
--dbcs //<host name/ip address>/DB122H1 \
--schemas SCHEMA_1,SCHEMA_2,SCHEMA_3,SCHEMA_4 \
--dumpname expdp.dmp --dumppath /tmp \
--ohome /u01/app/oracle/product/12.2.0.1/dbhome_1 \
--adbname RCATP \
--adbcfile /opt/mv2adb/source/Wallet_RCATP.zip \

# ./mv2adb impdp \
-ociregion us-phoenix \
-ocinamespace NAMESPACE_NAME \
-ocibucket BUCKET_NAME \
-ociid mail@corp.com \
-adbname RCATP \
-cfile /opt/mv2adb/source/Wallet_RCATP.zip \
-ichome /u01/app/oracle/product/instantclient_18_3 \
-dumpfile rcatp_exp_01.dmp,rcatp_exp_02.dmp \
-encryption \
-enctype AES256

For more usage Syntax and examples, refer MOS 2463574.1.

One of the advantages of MV2ADB is that the tool automatically install, configure and execute the Schema Advisor.

The tool can be used with configuration file or command line options.


References:

5.10.2020

Migration methods to Autonomous Database (ADB) - Part I (Data Pump)

In this part of on-premise Oracle database migration to ADB series, we will focus on set of tools to migrate your on-prime database to Autonomies database (ADB). We will briefly discuss about various migration solutions offered by Oracle and walk through data pumps migration pre-requisites and procedure.

Database cloud migration requires a good amount of knowledge about various methods offered by Oracle and the best solution that suits your business need. The best place to start with understanding various database cloud migration solutions is to visit the below interactive Cloud Migration Advisor page designed by Oracle:


ADB Schema Advisor

Once adequate knowledge is gained, the very next step is to know the restrictions & limitations imposed by Oracle ADB. Oracle simplifies this task by introducing a advisor, ADB Schema Advisor. Configure Oracle Autonomous Database Schema Advisor to analyze existing on-premise database and get a report on any concerns that may arise during migration phase. ADB Schema Advisor a very light weight utility with capabilities to analyze existing on-premise database for migration suitability. You can also easily drop the schema. As there are certain limitations with some data types in ADB, the utility helps analyzing and reporting such objects with restricted data types in on-premise database as part of analysis. The utility runs on existing schemas and produces following report:
  • Migration summary report with object count
  • List objects that can't be migrated to ADB due to restrictions and limitations
  • Also, objects list that can be migrated with modifications automatically during import process 
  • And Best practices and guidance are listed under Information section
You can download the ADB Schema Advisor utility from MOS 2462677.1, which also includes installation & executions steps and advisor output.

Migration methods

Below picture depicts various set of tools supported by Oracle to migrate your on-premise Oracle database to Autonomous Database:


Cloud migration path

To be able to migrate the data, dump files must be placed in cloud storage, either from Oracle, Microsoft Azure, AWS S3 or Oracle cloud object storage. 


Migrating with Oracle Data Pump

Oracle Data Pump offers flexible and fast data movement between Oracle databases. Data pump lets you import from dump files residing on cloud storage. Refer the following example to export on-premise database:

expdp sh/welcome123@mydb \
exclude=index,cluster,indextype,materialized_view,materialized_view_log,materialized_zonemap,db_link \
data_options=group_partition_table_data  \
parallel=16 \
schemas=sh \
dumpfile=exp_MYDB_%u.dmp \
encryption_pwd_prompt=yes
Below are some guideline and recommend parameters to use with expdp:

  • Schema level export for ADB migration
  • Use parallelism to speed-up export job
  • Exclude data types that are not supported in ADB with exclude parameter 
  • With data_options parameter, you can group portions into a non-partition table, recommended by ADB
Once the database is exported, move the dump files to Cloud Storage. In this blog, we will presume you have Oracle Cloud Object Storage option to put your dump files.

Download the latest Oracle client software on your desktop (if not exist) with also includes the latest Data Pump utilities. Before you start importing the database into ADB, ensure the following are in-place:

  1. An ADB database is configured, up and running
  2. You have downloaded the ADB connect credentials from OCI page for the ADB
  3. Export files are moved to Cloud storage
  4. Create cloud storage credentials in ADB 
For more details about credentials download, refer my earlier blog post.

If you are using Oracle cloud object storage, you will have to create a bucket and place all your dump files.

Create cloud storage credentials in ADB referring below example:

BEGIN
  DBMS_CLOUD.CREATE_CREDENTIAL(
    credential_name => 'DEF_CRED_NAME',
    username => 'adwc_user@example.com',
    password => 'Welcome12$'
  );
END;
/

Once the credentials are created in ADB, run the imp command from your desktop referring the example below:

impdp admin/password@ADWC1_high \       
     directory=data_pump_dir \       
     credential=def_cred_name \      
     dumpfile= https://objectstorage.us-ashburn-1.oraclecloud.com/n/namespace-string/b/bucketname/o/export%u.dmp \
     parallel=16 \
     encryption_pwd_prompt=yes \
     partition_options=merge \ 
     transform=segment_attributes:n \
     transform=dwcs_cvt_iots:y transform=constraint_use_default_index:y \
     exclude=index,cluster,indextype,materialized_view,materialized_view_log,materialized_zonemap,db_link
If you have worked with ADB, you know that admin is the default administrator user. If you wanna use different user to import, then, you will have to create that user in the ADB with required privileges for import. You can choose the TNS service name from the credentials file you have downloaded. You must specify the object URL in the dump file parameter, which is the location of your bucket with dump files.

You may notice we didn't mention the log file in the impdp. To review the log file, you may have to move the file to your object storage using the syntax below:

BEGIN
  DBMS_CLOUD.PUT_OBJECT(
    credential_name => 'DEF_CRED_NAME',
    object_uri => 'https://objectstorage.us-ashburn-1.oraclecloud.com/n/namespace-string/b/bucketname/o/import.log',
    directory_name  => 'DATA_PUMP_DIR',
    file_name => 'import.log');
END;
/

Conclusion
In nutshell, we have learned about various set of tools supported by Oracle to migrate on-prime database to ADB and a walk through a procedure of migrate an on-premise database to ADB using data pumps with best practices for fast migrations. In the subsequent blog posts, we will learn about MV2ADB and other tools and their procedure to migrate to ADB. 

References:

Refer some of below notes and links for more understanding about on-premise database migration to Oracle ADB.

Oracle Autonomous Database Schema Advisor (Doc ID 2462677.1)
https://docs.oracle.com/en/cloud/paas/autonomous-data-warehouse-cloud/user/load-data-data-pump.html#GUID-30DB1EEA-DB45-49EA-9E97-DF49A9968E24
https://www.oracle.com/middleeast/database/technologies/cloud-migration.html
https://www.oracle.com/webfolder/s/assets/webtool/cloud-migration-advisor/index.html

Note : Pictures & Diagrams copied from various Oracle presentations for eduction and demo purpose only.

11.27.2016

Exadata migration

Had a wonderful Sangam16 conference in India, and received much applaud for the two presentations delivered,  Oracle 12c multitenancy and Exadata migration best practices.

After a very short trip to India, life started to be business as usual again, and become busy. Was fully occupied with multiple assignments: Oracle EBS database health check assessment at a client for 2 days, GI/RDBMS/PSU deployments on Oracle Sun Super Cluster M7, Exadata configuration preparation and 9 databases migration to Exadata during the week-end.

Over the last week-end, we (me and my colleague) were pretty busy with 9 databases migration to Exadata. There were a few challenges , and learned a few new things too. I would like to discuss couple of scenarios that were interesting:

One of the databases had corrupted blocks, and the expdp was keep failing with ORA-01555: snapshot too old: rollback segment number  with name "" too small. Our initial thoughts were tuning undo_retention, increasing the undo tablespace, setting an event, etc. Unfortunately, none of the workarounds helped in the situation. We then cameacross a MOS note which explains that an ORA-01555 with "", no rollback segment name is probably due to corrupted blocks. After applying the solution explained in the note, we managed to export/import the database successfully. My colleague has blogged about the scenario at his blog: http://bit.ly/2fBOxm7

Another database is running on Windows x86 64-bit, and its full of LOBs, hence, the datapumps (expdp) took significant time, as NFS filesystem used to store the  dump file. We then thought of doing direct RMAN restore from source to target, as the database on Windows x86 64bit and Linux x86 64-bit are the same (Litten) Endian formats. As per one of the MOS notes, we can also do the Data Guard setup, and do RMAN restore. However, RMAN recovery would fail with ORA-600, as cross platform redo conversion won't be possible. We are now thinking of taking a cold backup (consistent) and do a complete restore with reset logs option.

Stayed tuned for more updates on this.